Perspective mapping
Perspective mapping is similar to Parallel mapping, except that the content originates at an emitter point and gets larger in size as you go further away from the emitter, similar to a real projector. You can use Perspective mapping to make 2D content appear as 3D (not stereoscopic but rather as a 3D effect), but only from a specific point of view which is the same point as the position of the emitter.
Perspective mapping can map 3D content onto a surface from a specified vantage point of a virtual camera. This camera can be linked to a virtual camera in a generative software such as Notch to create an immersive 3D environment. The content being displayed by the mapping will begin emitting at the vantage point and get larger as that surfaces moves farther from it, similar to a real projector.

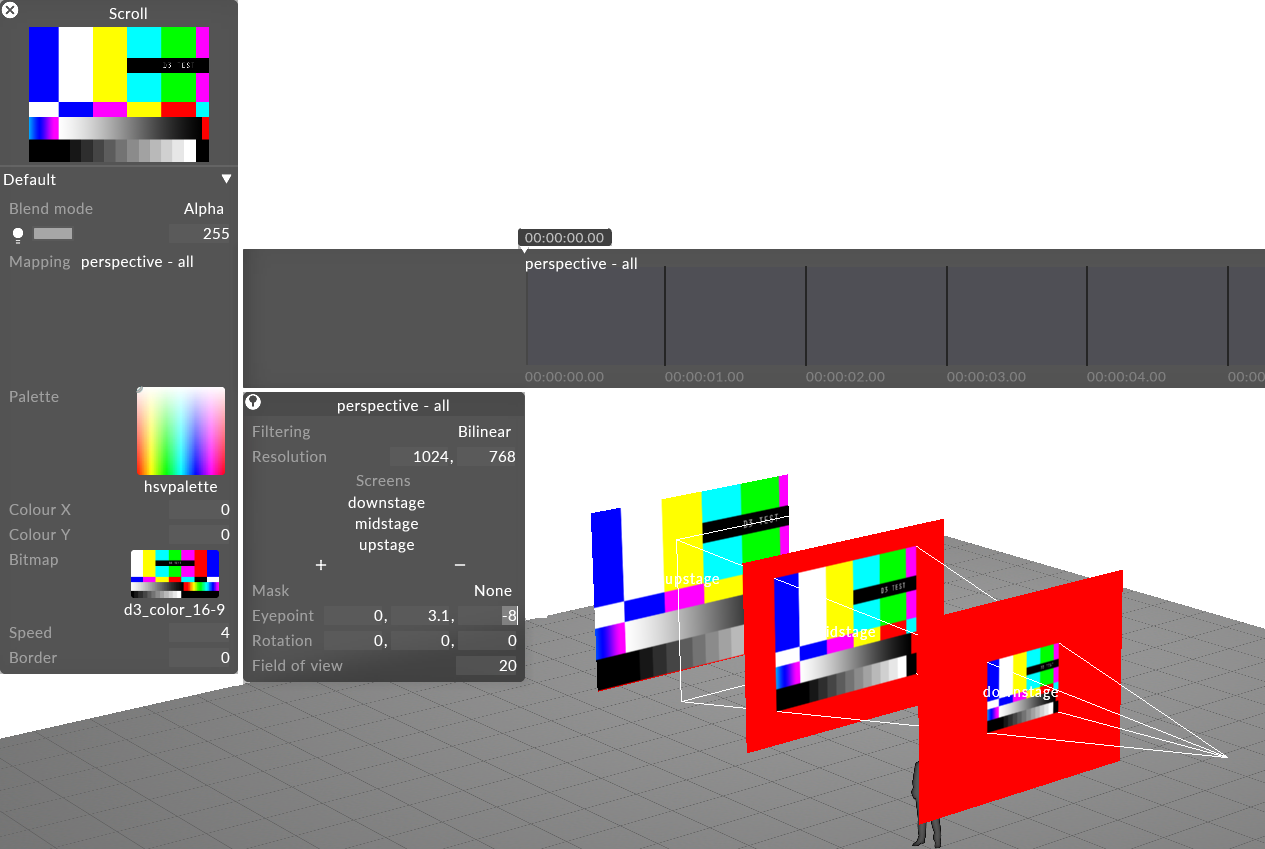
Perspective mapping type being used to project content onto three Screens, notice the content becomes larger as the Screens move further away from the emitter point
-
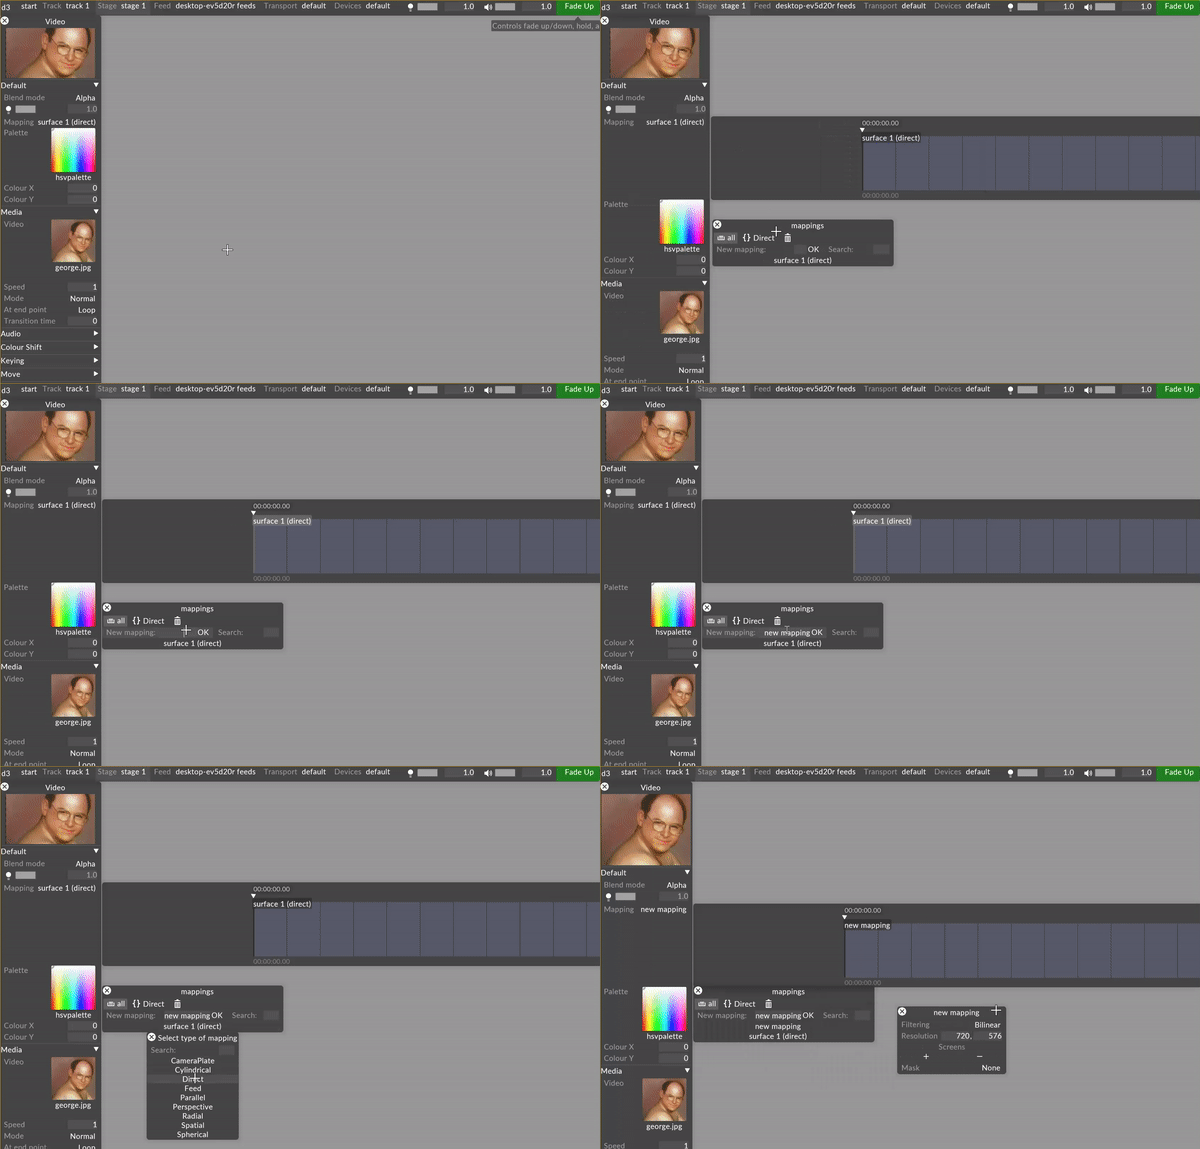
In your track, create a new visual layer. These layer types can include content layers, generative layers, and effect layers.
-
Left click on the layer in the track to open the Layer Editor on the left side of the GUI.
-
Under the Default tab, left click on the Mapping parameter to display a list of the mappings in the project.
-
A manager titled mappings will appear – this is a list of all mappings within your project. By default, all screens will be populated with a direct mapping sharing the same name, and all cameras will be populated with a perspective mapping sharing the same name.
-
Type directly into the New mapping: text field to create a new mapping. A list will appear prompting to you select the mapping type.

-
An editor with the user assigned name of the mapping will appear once a mapping type is selected.
-
Assign all screens that will be used for the mapping and enter the resolution of the content that will be displayed on the screens.
-
Edit the specific properties of the chosen mapping type.
-
Assign a piece of content to the layer in the track, and the content will be displayed on the assigned screens of the mapping in the stage and the feed output window.
This section explains the properties that are shared by the six different mapping types.
Filtering
Nearest - Nearest neighbor filtering. Use nearest-neigbour sampling, to disable blending between pixels when scaling. Can be used to create pixellated looks, or to ensure hard edges on certain types of content.
Bilinear - Bilinear filtering is a texture filtering method used to smooth textures when displayed larger or smaller than they actually are.
2x Multi-sample - Multi-Sample filtering can help fix issues with scaled content, but can introduce some blurriness.
Resolution
This controls the canvas size the layer renders into, in pixels. The Direct mapping type starts with a 256x256 pixel canvas and automatically sets the canvas size to that of the first screen you add.
Screens
This is a list of screens that the selected mapping type can copy content to.
-
Left-click + to open the Screens manager.
-
Left-click the Screens you want to map. This will copy the individual canvas content onto these three Screens simultaneously and will add the Screen names to the mapping object editor.
-
Left-click and drag the Screens listed in the mapping object editor to -. This will remove the canvas content from the Screens and delete the Screen names from the mapping object editor.
Mask
This points to the Texture file that defines a Mask bitmap. You can use this property to apply a Mask bitmap to the mapping canvas. Selecting this property will open the Texture object library, which shows all of the still image files saved on your local hard-drive in the DxTexture folder.
To apply a mapping mask you will need to create and import a custom still image file.
-
The step-by-step instructions on how to create and import a custom Population mask can be used to create a custom mapping mask. The only difference is that the mapping masks resolution should be the same as the mapping canvas. For step-by-step instructions on how to create and import a Population mask into a d3 project visit to the section Population mask in the Editing screens sub-chapter.
-
Alternatively, set any layers blend mode to mask to channel the layer content into the mapping mask.
Eye point
The Eye point specifies the source point (emitting point) of the Perspective mapping.
Rotation
The Rotation parameter specifies the rotation of the frustum of the Perspective mapping (i.e. the aiming point of the Perspective mapping).
Field of view
Defines the field of view of the Perspective mapping, in degrees (i.e. the size of the mapping coverage).