The reimaging process we refer to as Redisguise is the process of performing an update on the system using a bootable USB drive. This process does not affect the media drive.
Please note: If you experience any problems during updating or restoring the system, or any of these instructions are unclear, please contact the support team.
Warning: The system needs to be connected to the internet during this procedure
This process can be used to update to a newer OS image, or revert to a previous OS image.
To tell what OS image your system is on please go to the Help menu in d3manager and select About Manager.
If you are updating from an OS earlier than 3.0 your system will do a cold reboot as it performs firmware level updates to some of the components. Please don't be alarmed, just switch the system back on again using the power button
-
A 32Gb USB memory stick
-
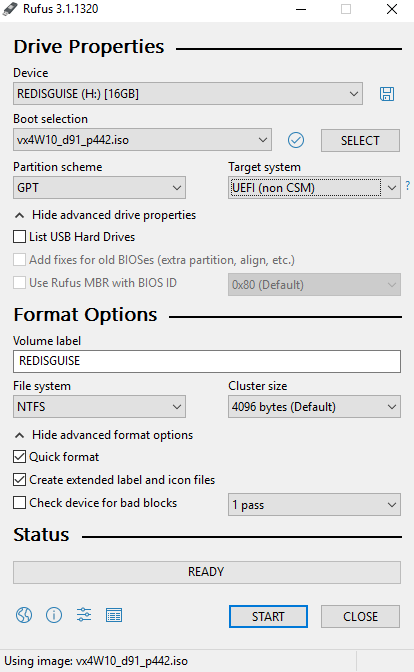
A version of Rufus to turn it into a bootable disk. Make sure the volume name of the usb is: "REDISGUISE" as per image
-
An internet connection to the machine you are re-imaging
-
Download and install a version of 7Zip
-
Download and unzip the multi file archive using 7Zip
-
OS images can be found here.
Please note: You do not need to extract all parts individually. Simply place them in the same directory and then use 7zip to extract the ISO by selecting any part. 7zip will automatically unzip all parts to create the image file.
-
Download and unzip the multi file archive using 7Zip (NOTE: you will only need to unzip file 001):
.png)
-
Create Bootable USB stick with the unzipped ISO.
The settings should be:
-
Partition scheme - GPT
-
Target system - UEFI - non CSM
-
Volume label - automatically pulled from ISO file
-
File system - NTFS
Warning: These settings are critically important. The re-image process will fail if they are not set correctly.
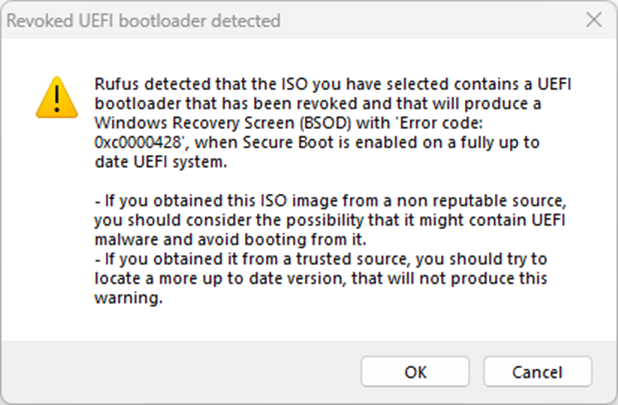
Please note: On the latest versions of Rufus you may see this warning. This is expected and does not apply to current disguise hardware. Please click OK to continue as normal.

-
-
Plug in your USB Drive to your disguise server and switch it on.
-
Go into the BIOS by waiting for the disguise logo to appear and then keep tapping Delete on the keyboard until the blue BIOS screen appears.
-
Use the left and right arrow keys to scroll through the tabs until you get to the “Save and Exit” tab.
Note: Do not select ‘Save Changes’, as you only need use the ‘BootOverride’ Section here.
-
Use the up and Down arrow keys to navigate to the ‘Boot Override’ section. In this section you will see all of the boot options available to you.
-
In the Boot Override section, look for this option:
UEFI: [diskname], Partition 2
This may vary depending on the manufacturer of the USB stick in use.
-
Select this option, then press enter to begin the OS upgrade process.
-
Redisguise will then load automatically, completing the reimage. If the reimage is not successful, a log file will be accessible on the USB flash disk. This is useful if contacting disguise support.
Please note: performing a system restore from the new disk image will erase any valuable data on your system drive. Please ensure you make a back up of any essential files from your system (C:) drive before initialising this process. The process does NOT destroy any media or projects on your media drive.
